Webhook Setup
Webhooks in SupportGenix allow you to send data to CRMs or third-party applications based on specific events such as ticket creation, ticket reply, or client creation. Follow the steps below to set up a webhook effectively.
Benefits of Using Webhooks in Support Genix 🎯
- 🚀 Automate Workflows: Automatically send data to third-party apps, reducing manual intervention and saving time.
- 🔗 Seamless Integration: Connect SupportGenix with CRMs, marketing tools, or other platforms to streamline operations.
- ⚡ Real-Time Data Transfer: Trigger events instantly, ensuring your systems are always up-to-date.
- 📊 Enhanced Reporting: Export data to analytics tools for better tracking and decision-making.
- 🛠️ Customizable Triggers: Choose specific events (e.g., ticket creation, replies) to meet your unique business needs.
Step 1: Navigate to Webhook Settings
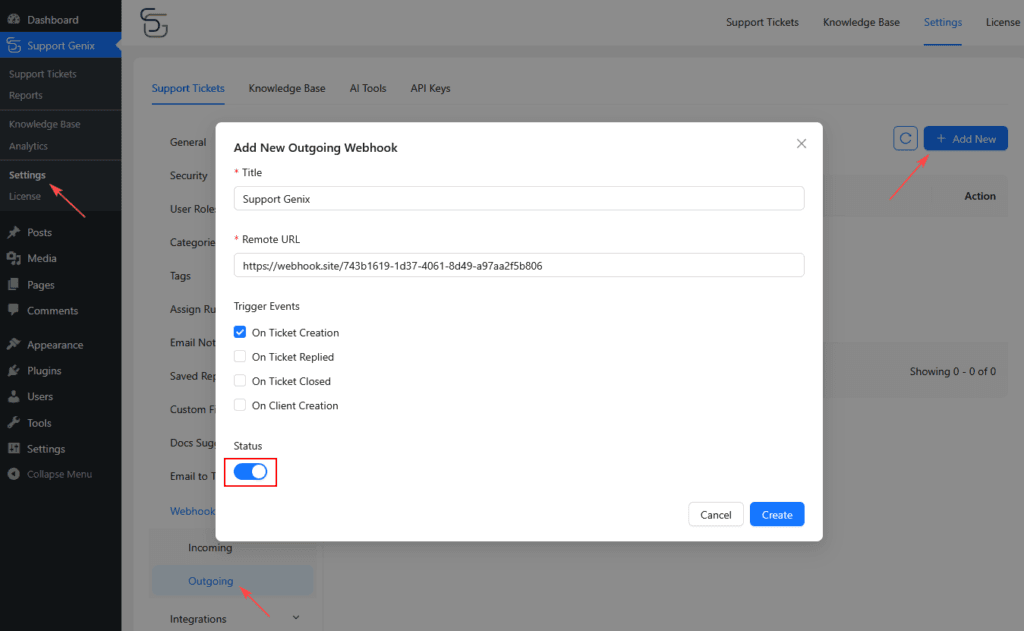
- Go to
SupportGenix>Settingsin your dashboard. - Select
Webhooksfrom the left-hand menu. - Choose the
Outgoingtab.
Step 2: Add a New Webhook 🔗
- Click on the “Add New” button in the top-right corner.
- Fill out the required fields:
- Title: Enter a descriptive title for the webhook.
- Remote URL: Input the URL of the tool where you want to send data.
- Trigger Events: Select the event(s) to trigger the webhook:
- On Ticket Creation
- On Ticket Replied
- On Client Creation
- Toggle the Status switch to enable the webhook.
- Click Create to save your webhook.

With this setup, your SupportGenix instance will send data automatically to your specified tools, enhancing workflow automation and integration capabilities.
Ensure you test the webhook after setup to confirm it’s working as intended.
Last updated on December 21, 2025