WooCommerce Integration
Welcome to the Support Genix documentation for WooCommerce Integration! This guide provides step-by-step instructions on connecting your WooCommerce store with Support Genix to streamline your customer support process. By integrating these two platforms, you can offer an enhanced customer experience, manage multiple stores effortlessly, and ensure a seamless workflow for support and ticket management.
🚀 Benefits of WooCommerce Integration
- Centralized Ticket Management: Manage support tickets from multiple WooCommerce stores in one platform, saving time and effort.
- Seamless Data Syncing: Automatically sync order details to tickets, ensuring accurate and up-to-date information.
- Enhanced Customer Support: Access purchase histories directly within tickets for personalized and efficient support.
- Customizable Auto Ticket Creation: Automate ticket creation for new orders with customizable ticket details, reducing manual effort.
- Streamlined Workflow: Simplify support workflows with easy-to-navigate settings and integrations.
Steps to Integrate WooCommerce with Support Genix
To integrate WooCommerce with Support Genix, make sure that Support Genix pro edition is activated on your website.
Same-Site Integration
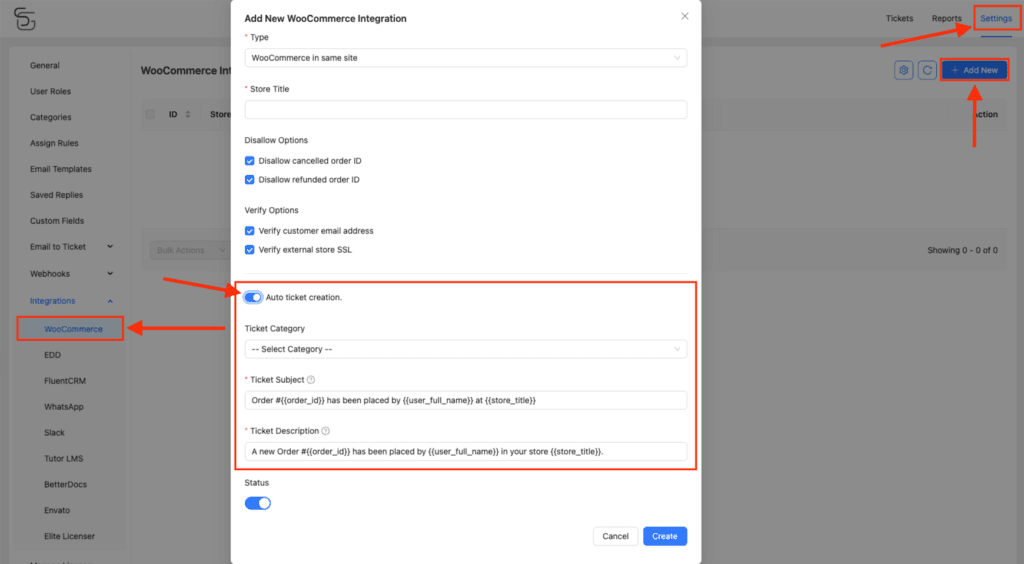
Step 1: Navigate to WooCommerce Integration Settings
- Go to WordPress Dashboard > Support Genix > Settings > Integrations > WooCommerce > Integrations.
- Click on the Add New button.
Step 2: Configure Integration Settings
Fill in the required fields:
- Type: Select “WooCommerce in Same Site.“
- Store Title: Enter your WooCommerce store’s name.
- Disallow Options:
- Turn on to disallow canceled or refunded order IDs from creating tickets.
- Verify Options:
- Verify customer email addresses.
- Verify SSL for the same site.
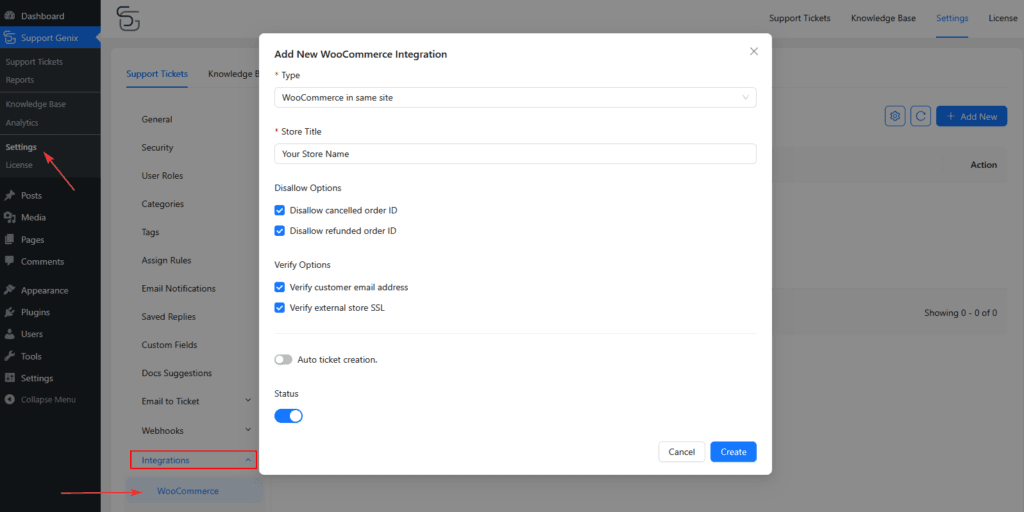
Step 3: Save Changes
Click the Create button to save your settings. After setup, the Order ID field will be visible in the ticket creation form.
External Site Integration
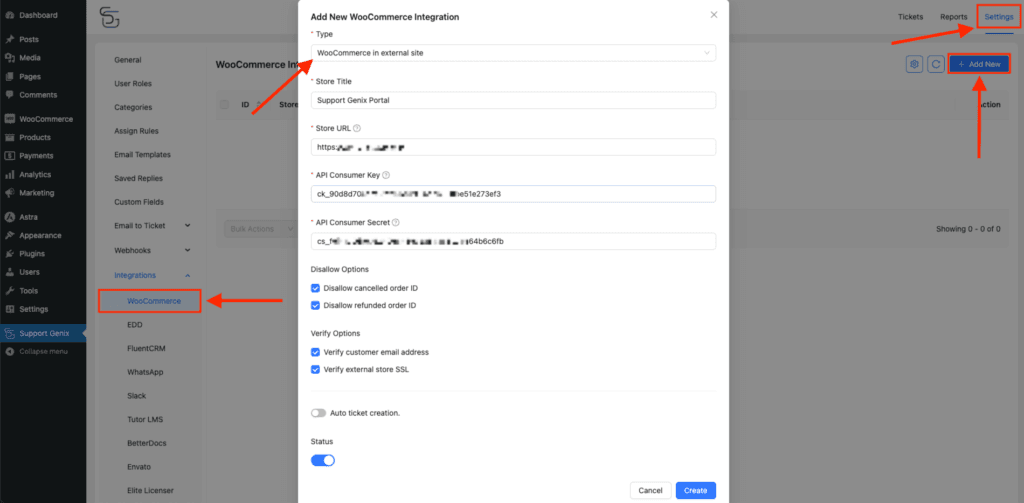
Step 1: Navigate to External Site Integration Settings
- Go to WordPress Dashboard > Support Genix > Settings > Integrations > WooCommerce > Integrations.
- Click on the Add New button.
Step 2: Configure Integration Settings
- Type: Select “WooCommerce in External Site.“
- Website/Store URL: Enter the external site URL.
- API Credentials: Add the WooCommerce REST API Consumer Key and Consumer Secret from your external site.
- Disallow and Verify Options: Same as above.
- Auto Ticket Creation: Customize Ticket Category, Subject, and Description as needed. Use placeholders for dynamic data.
Step 3: Create API Credentials
- Go to WooCommerce > Settings > Advanced > REST API in your external site.
- Click Add Key to generate Consumer Key and Consumer Secret. Use these credentials in the Support Genix settings.
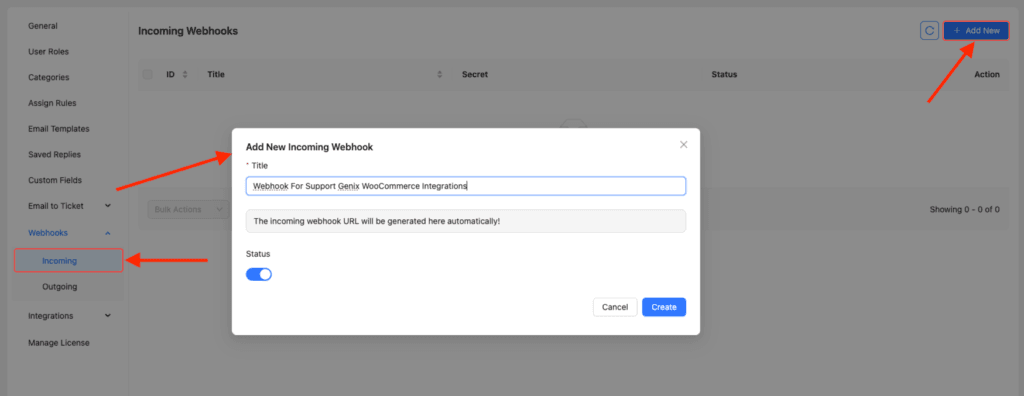
Step 4: Webhook Setup for External Site
- Create an Incoming Webhook in Support Genix:
Navigate to Support Genix > Settings > Webhooks > Incoming Webhooks and click on Add New. - Add Webhook to External Site:
Go to WooCommerce > Settings > Advanced > Webhooks on the external site.- Add the copied Webhook URL from Support Genix.
- Set Order Created as the topic.
Automatic Ticket Creation for WooCommerce Orders
For both same-site and external-site integrations, automatic ticket creation can be enabled. Customize the Ticket Subject and Description with placeholders to ensure relevant information is included in every ticket.
Placeholders Available:
{{store_id}}: The unique ID of the WooCommerce store.{{store_title}}: The title or name of the WooCommerce store.{{store_url}}: The URL of the WooCommerce store.{{order_id}}: The unique ID of the customer’s order.{{user_email}}: The email address of the customer.{{user_first_name}}: The first name of the customer.{{user_last_name}}: The last name of the customer.{{user_full_name}}: The full name of the customer (first and last names combined).
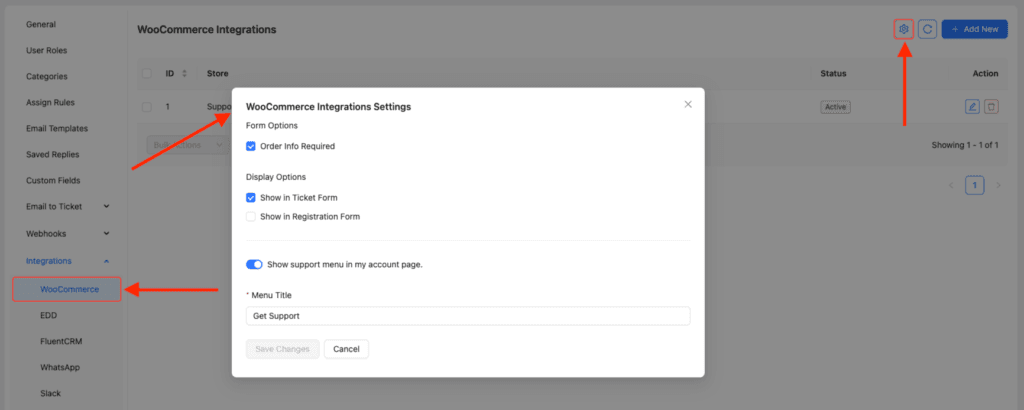
🔧 Essential Settings for WooCommerce Integration
- Navigate to:
WordPress Dashboard > Support Genix > Settings > Integrations > WooCommerce > Settings. - Configure Display and Form Options:
- Order Info Required in Create Ticket Form.
- Display Store & Order ID in Forms.
- Hide Store Field for Single Integration.
- Menu in WooCommerce My Account Page.
Last updated on March 15, 2026
Was this article helpful?
Powered by Support Genix