How to Customize Your WordPress Support Ticket Plugin to Match Your Brand: A Comprehensive Guide
If you’re running a business website using WordPress, then you know that customer support is a necessary part of keeping your customers happy. And if you’re using a support ticket plugin, then you know that customization is key.
In this blog post, we’ll show you how to customize your WordPress support ticket plugin to match your brand. Here we are using a special WordPress support ticket plugin named Support Genix that provides an easy-to-use and intuitive settings panel to set up your support system to match the style of your brand.
We’ll cover everything from the colors, dashboard image, and client page image to the logo, favicon, etc. So whether you’re just starting out or you’ve been using the same plugin, this blog post is for you.
Why Customizing Your Support Ticket Plugin is Important?
To customize your WordPress support ticket plugin, it is incredibly important for several reasons. First and foremost, it allows you to reflect on the branding of your business and make sure your customers have an experience that is consistent with the rest of their experience with your brand.
It also helps ensure that they are able to easily access all of the features that they need and that they can quickly find the help that they need.
How to Customize Your WordPress Support Ticket Plugin to Match Your Brand
Install and Activate the Plugin
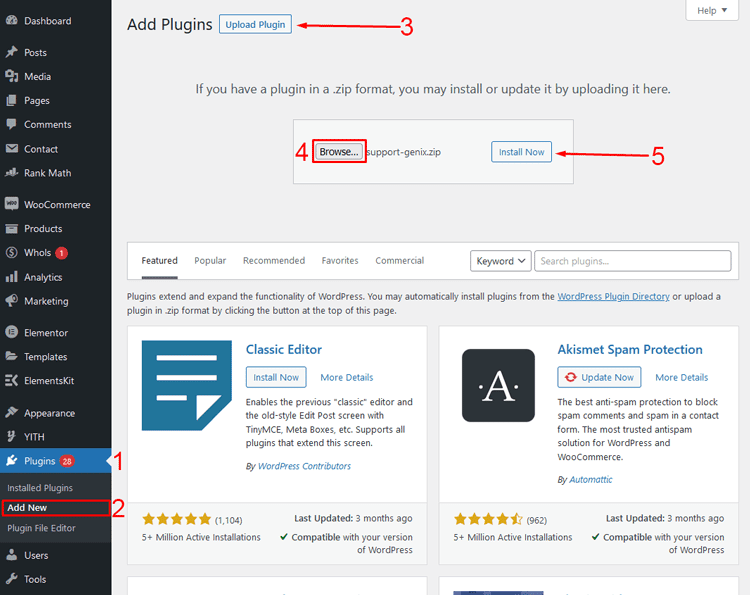
First of all, make sure that the plugin is already installed and activated in your WordPress dashboard.
In case it isn’t, then you can do so by browsing Plugins > Add New. Then upload the plugin (if you have the pro version) and then install and activate it.
Note that to set the color of your support ticket system to match your brand color, you need the pro version of the plugin.
However, if you don’t require this feature, you can try the free version of this plugin.
To start using the free version, go to Plugins> Add New on your WordPress dashboard. Then, on the search box, write “Support Genix,” and you’ll find the plugin. After that, simply install and activate it.
Once you have installed and activated the plugin, you will find the Support Genix menu on your WordPress dashboard, from where you can configure all the settings.
Change the Color to Match Your Brand
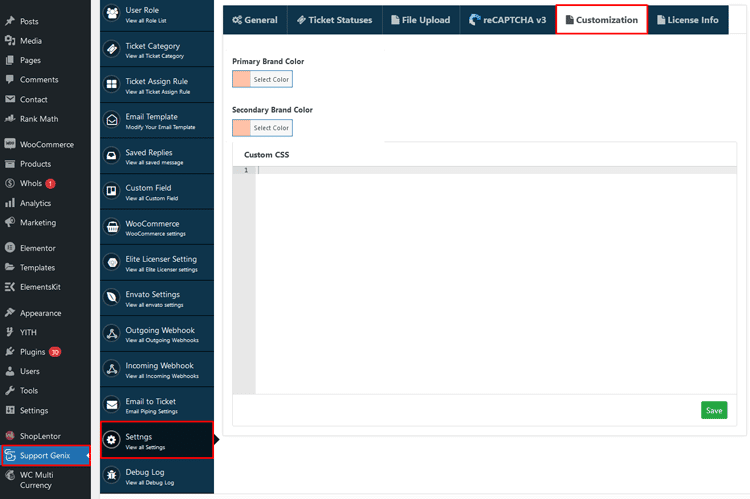
With Support Genix, it’s easy to customize the colors of your dashboard, client page, and any other pages associated with your plugin.
To change the color, go to the Plugin dashboard and browse the settings. After that, switch to the Customization tab, where you can set the primary and secondary brand colors of your brand.
After choosing the right colors, don’t forget to click the “Save” button to make the changes.
Change the Support Ticket Logo and Favicon
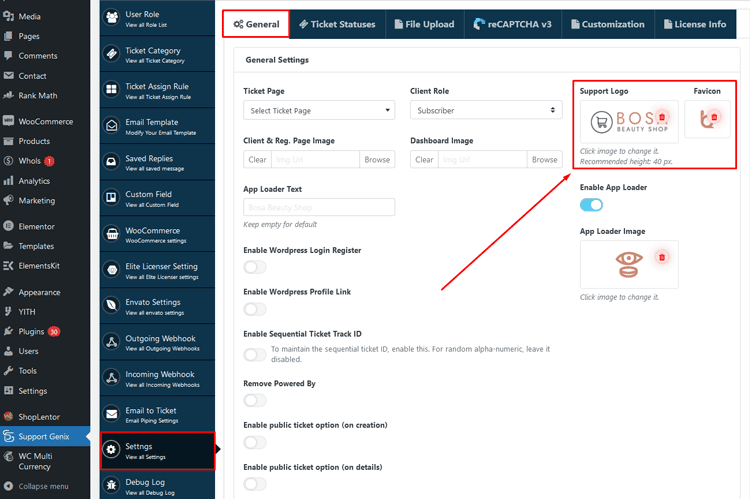
Changing the logo and favicon of your WordPress support ticket plugin is an important step to ensure that your brand can be easily recognized in the support system.
To get started, browse the General tab from the settings panel of the Support Genix plugin dashboard. There you will have the option to upload your brand logo as well as your favicon.
Set the Client & Reg. Page Image and Dashboard Image
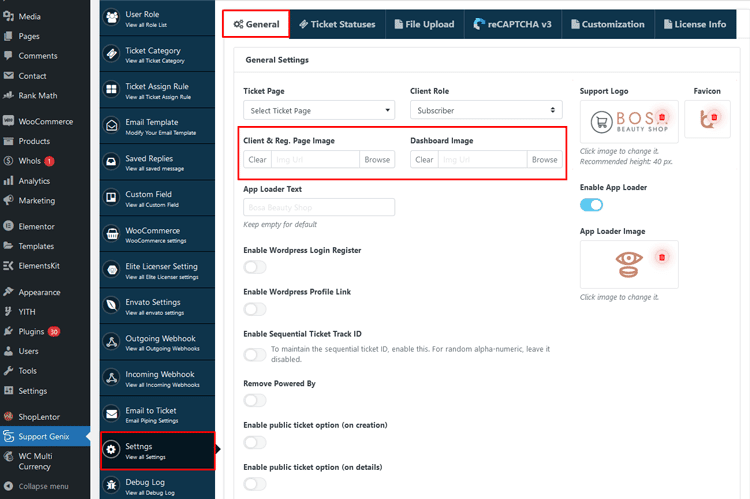
The Support Genix plugin also allows you to add a custom image for the client page, registration page, and dashboard. This helps to ensure that your support system has a consistent look and feel.
To set up these images, navigate to the General tab from the settings panel of the Support Genix plugin dashboard. There you will find options to upload the images.
Lastly, don’t forget to click the “Save” button to make the changes.
Set App Loader Text and Image
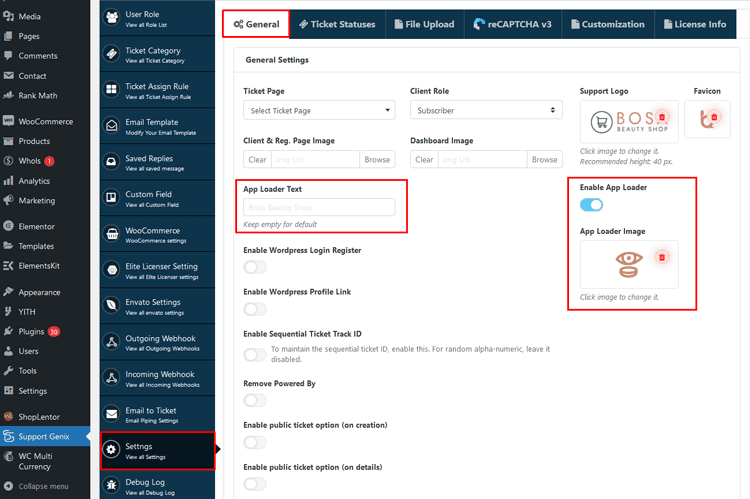
Finally, the Support Genix plugin also allows you to set a custom loader text and image. To do this, browse the General tab from the settings panel of the Support Genix plugin dashboard. There you will find options to upload the image as well as customize the text according to your preference.
Tips for Making Sure Your Branding Stays Consistent Across All Pages
Once you have customized the look of your Support Genix plugin, there are some additional steps that you can take to ensure that your branding stays consistent across all pages. Here are some tips for doing so:
• Ensure that your brand logo is always visible in the top left corner of all pages
• Use the same color scheme across all pages
• Make sure that the fonts used in the support system are consistent with those used on your website and other related materials
• Use custom images to ensure a consistent look throughout the support system
These tips will help you create an experience that is both professional and cohesive, making it easier for customers to recognize your brand and get the help they need.
Support Genix
WordPress Support Ticket Plugin
Take Your Customer Support to The Next Level and Boost Customer Satisfaction Rates
Frequently Asked Questions
How do I install and activate the Support Genix plugin?
Installing and activating the Support Genix plugin on your WordPress dashboard is a simple and straightforward process. To get started, open the WordPress Admin Panel and navigate to
Plugins > Add New.
Here you will find an option to upload the plugin in the form of a ZIP file. After selecting the right file, click on Install Now and then Activate to start using the plugin.
How do I customize the appearance of my Support Genix dashboard?
Customizing the appearance of your Support Genix plugin is easy and straightforward. To get started, open the WordPress Admin Panel and navigate to
Support Genix > Settings.
From here, you can change the color, add a logo and favicon, and set the client & reg. page image, and more. Don’t forget to click the “Save” button after making any changes.
Can I add custom images for my Support Genix dashboard?
Yes, you can easily add custom images for your Support Genix plugin dashboard. To do this, open the WordPress Admin Panel and navigate to
Support Genix > Settings.
From here, you can upload images for the client page, registration page, dashboard, and more. Don’t forget to click the “Save” button after making any changes.

Is it possible to customize my brand colors using the plugin?
Yes, it is possible to customize your brand colors using the Support Genix plugin. To get started, open the WordPress Admin Panel and head over to the Settings section of the Support Genix dashboard. In the Customization tab, you will find options called “Primary Brand Color” and “Secondary Brand Color”. Here you will be able to personalize the color of your support ticket system to match your brand.
Can I change the logo and favicon of my WordPress support ticket system?
Yes, you can easily change the logo and favicon of your WordPress support ticket system. To do this, open the WordPress Admin Panel and head over to the General tab in the Settings section of the Support Genix plugin dashboard. Here you will find options to upload a new logo and favicon. Don’t forget to click on “Save” after making any changes.
Closing Thoughts
Customizing your WordPress support ticket plugin is a great way to ensure that customers have a consistent experience when using your system. With Support Genix, you can easily customize the colors, logo, favicon, client page image, and more to create a look that is both professional and recognizable. By following these tips and using the plugin’s extensive customization options, you can easily customize your WordPress Support Ticket Plugin to match your brand and make sure that your brand stays consistent across all pages in the support system.

