How to Add an AI Chatbot to WordPress Using Your Documentation

If your support team answers the same five questions every day, an AI chatbot for WordPress can take some of that repetitive work off their plate. SupportGenix lets you turn your WordPress Knowledge Base into a source for AI-assisted customer support.
When visitors ask questions, the chatbot searches your published documentation for relevant information and can point users toward related help articles.
Quick answer: To add an AI chatbot for WordPress using your documentation, install SupportGenix, enable the AI Chatbot, connect an AI provider, publish Knowledge Base articles, and let the chatbot search that content to answer customer questions automatically.
This guide walks through the full setup: enabling the chatbot, connecting your Knowledge Base, and reviewing chatbot conversations. It’s written for support managers and WooCommerce store owners who already have a support team and want to reduce repetitive ticket volume without hiring more agents.
If you’re looking for a WordPress AI chatbot that can work with your existing support content, this workflow shows how the pieces fit together.
Table of Contents
What Is a Documentation-Based AI Chatbot?
A documentation-based AI chatbot answers customer questions by searching your published support content instead of relying on a fixed script. Rather than following pre-written decision trees, it pulls relevant details from your Knowledge Base and presents them as a direct answer.
This matters because a chatbot without real documentation behind it can only greet visitors or collect basic details. When it draws from articles you’ve written and verified, customers get accurate answers instead of vague responses, and your team stops repeating the same explanations across ticket after ticket.
For support teams, an AI chatbot with Knowledge Base content is especially useful because the answers can stay aligned with the information you already maintain for customers.
Why Use Your Documentation for AI Customer Support?
Feeding your chatbot from existing documentation keeps its answers consistent with your actual policies, product details, and tone. It also reduces a common trust concern with AI support tools.
When the AI is restricted to content you’ve published, it has far less room to generate an answer that sounds plausible but isn’t accurate.
That makes this approach useful for businesses that want an AI customer support chatbot without separating chatbot knowledge from the documentation their support team already manages.
What You Need Before You Start
Before configuring anything, confirm you have these three things in place:
- A WordPress site with admin access.
- The SupportGenix plugin installed and activated.
- At least a starting set of Knowledge Base articles covering your most common customer questions.
If you don’t have a Knowledge Base yet, build one first. Without published Knowledge Base content, the chatbot has little or no documentation to reference when answering product-specific questions.
How to Set Up an AI Chatbot for WordPress with SupportGenix
In this tutorial, SupportGenix is the WordPress helpdesk plugin used throughout, since it includes a built-in Knowledge Base and AI Chatbot in one system. This avoids sync issues between documentation and chatbot answers.
Step 1: Enable the AI Chatbot
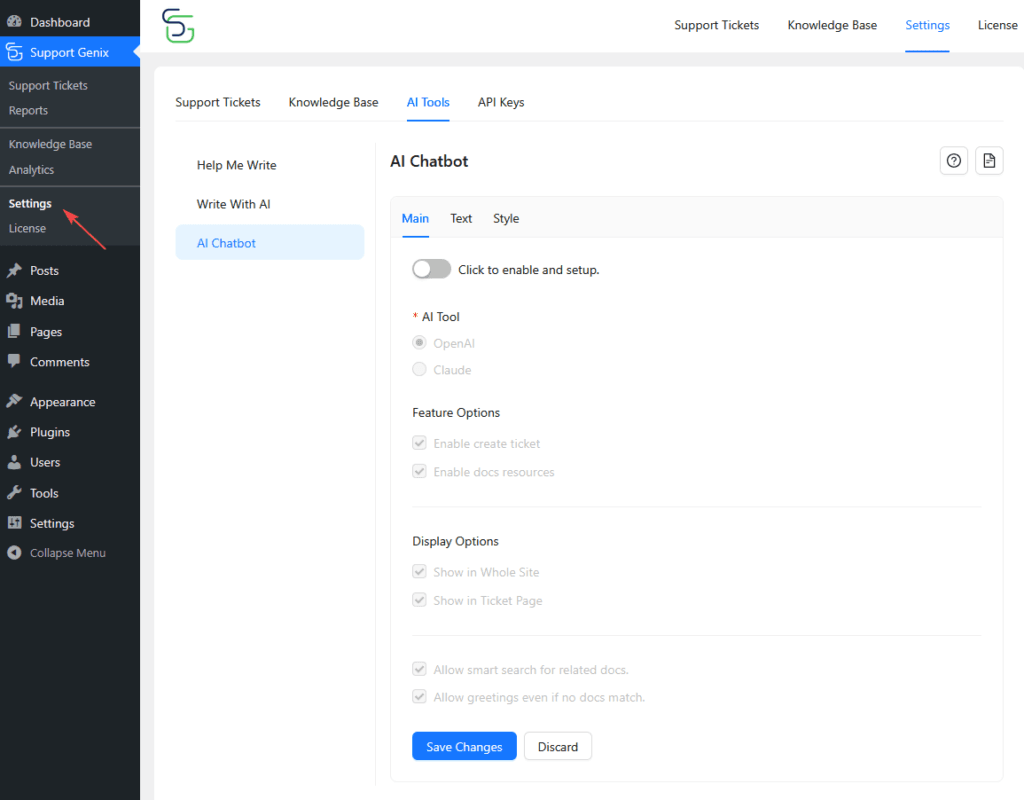
- Go to SupportGenix → Settings → AI Tools → AI Chatbot.
- Under the Main tab, toggle the switch to enable the chatbot.
Full setup details are covered in the AI Chatbot setup documentation.
Step 2: Configure an AI Provider
Depending on your SupportGenix configuration, available AI providers may include OpenAI or Claude. Configure the provider shown in your current AI settings and save the required API credentials.
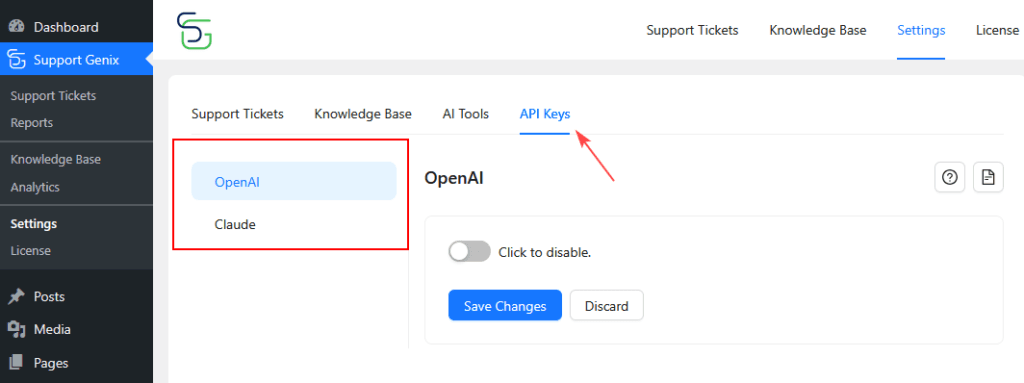
SupportGenix manages these API keys from a centralized settings page under SupportGenix → Settings → API Keys.
AI features will not work until at least one provider is properly configured. See the API Keys section within the chatbot setup guide for the exact configuration screen.
Step 3: Select Display Options
Choose where the chatbot should appear:
- Show in Whole Site
- Show in Ticket Page
Click Save Changes once these settings are configured.
Step 4: Customize Chatbot Text
On the Text tab, personalize the chatbot’s Chatbot Title, Welcome Message, Feedback Messages, Related Docs Title, Create Ticket Link Text, Input Placeholder, and Nothing Found & Error Messages. A chatbot that matches your brand voice builds more trust than one using generic wording.
Step 5: Create or Organize Your Knowledge Base
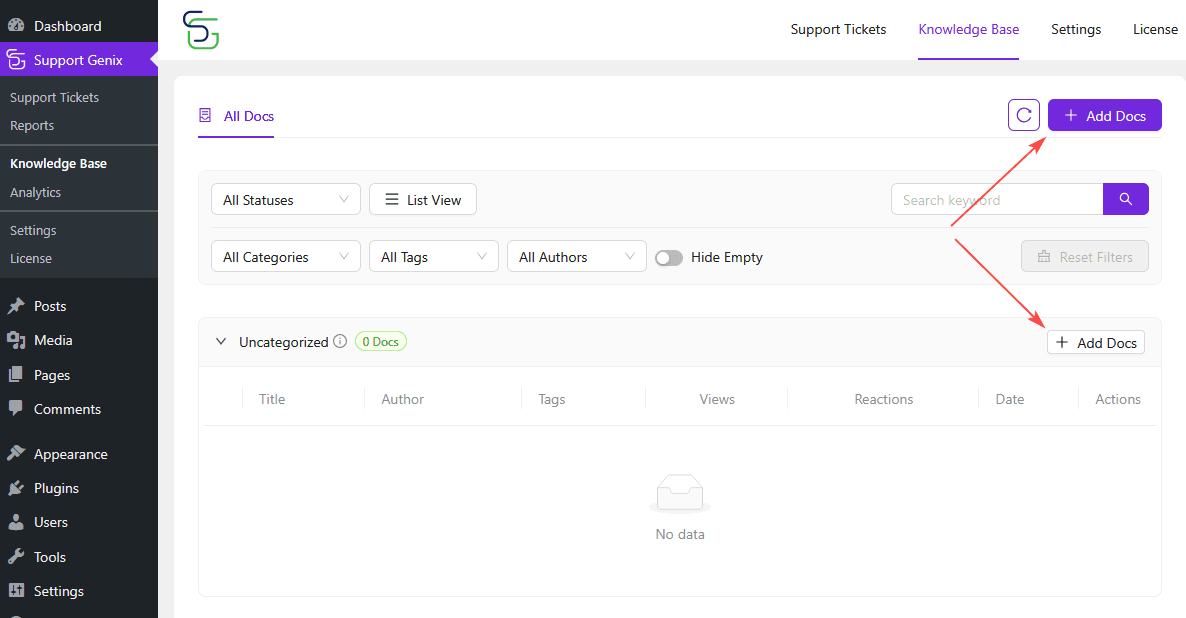
Go to SupportGenix → Knowledge Base and click Add New Docs to add content the chatbot should use to answer questions. Organize articles by the actual questions customers ask, not by internal team structure. Useful categories include:
- Order and shipping questions
- Account and login issues
- Refunds and cancellations
- Product setup and troubleshooting
- Billing and subscriptions
Each article should answer one specific question clearly. Publish the article once it’s ready.
Step-by-step formatting guidance is available in the Knowledge Base article documentation.
Step 6: Connect the Chatbot to Your Published Knowledge Base
Once your Knowledge Base articles are published and the AI Chatbot is enabled, SupportGenix can use that content when answering customer questions.
When a customer asks something, the chatbot searches available Knowledge Base articles for relevant information and uses it to generate a response. The more detailed and comprehensive your Knowledge Base, the more accurate the chatbot’s answers become.
The full training workflow is documented in the Knowledge Base training guide.
In other words, the SupportGenix AI chatbot works best when your documentation is treated as an active support resource rather than a collection of articles you rarely update.
Example Setup Scenario
A WooCommerce store selling digital courses installs SupportGenix, enables the AI Chatbot, and sets it to display across the whole website. The store owner writes Knowledge Base articles covering order tracking and refund policy, since those are the most common pre-purchase questions. The articles are published so the chatbot can reference them immediately.
For a store like this, the setup effectively creates a WordPress Knowledge Base chatbot that can use existing support articles as a source for customer-facing answers.
Support Genix
WordPress Support Ticket Plugin
Take Your Customer Support to The Next Level and Boost Customer Satisfaction Rates
How SupportGenix Uses Your Documentation
Related Documentation in Chatbot Answers
When the chatbot finds relevant Knowledge Base content, it can cite those articles as reference links directly in its response. This happens automatically once the chatbot is connected to the Knowledge Base, with no separate configuration needed beyond enabling the chatbot and publishing articles.
Customers can click through to read the full article if they want more detail, which gives them a way to verify the chatbot’s answer against the original documentation.
Note that Knowledge Base suggestions on the ticket creation form are configured separately under SupportGenix → Settings → Docs Suggestions and are a Pro feature, so they should not be confused with the chatbot’s automatic Related Documentation references.
More detail on both features is available in the Article Suggestions documentation.
Only for Chatbot Articles
SupportGenix includes an Only for Chatbot option on individual Knowledge Base articles. When this checkbox is selected, the article trains the AI Chatbot without appearing on your public-facing Knowledge Base. This is useful for internal or AI-specific guidance, such as edge-case troubleshooting notes, that you don’t want cluttering your published documentation.
Give Customers a Clear Path to Human Support
AI shouldn’t be expected to answer every support question. Configure clear fallback messaging and make the ticket option easy to find when the chatbot can’t provide a useful answer.
SupportGenix allows you to customize the chatbot’s Create Ticket Link Text as well as its Nothing Found and error messages, so customers who need a human always have an obvious next step instead of hitting a dead end.
Example Fallback Scenario
A customer asks the chatbot about installing a plugin update. The chatbot answers correctly using a Knowledge Base article. The same customer then asks a question the chatbot can’t resolve, such as an account-specific billing dispute. The chatbot displays its configured fallback message with a clear link to create a support ticket.
Review Chatbot Conversations
Go to SupportGenix → Chatbot Conversations to view, analyze, and manage every chatbot interaction from the admin dashboard. Metrics available in SupportGenix include:
- Total Sessions
- Today and This Week conversation counts
- Helpful Rate, the percentage of conversations marked helpful by customers
- Conversations Over Time and Peak Hours charts
- Related Documentation referenced in each conversation
Some of these features, including Helpful Rate and the charts, are part of the Pro plan.
Full dashboard details are covered in the chatbot conversations documentation.
Separately, track your own business metrics to measure real impact:
- Ticket volume before versus after chatbot deployment
- Repeat questions the chatbot struggles with
- Overall support workload
- Knowledge Base gaps revealed by unanswered chatbot questions
Improve Your Documentation Using Chatbot Feedback
Use the conversation review process to find gaps. If customers repeatedly ask the chatbot something it can’t answer well, that’s a signal to write a new Knowledge Base article, not a reason to give up on the chatbot. Regularly updating your documentation keeps chatbot answers accurate as your product or policies change.
This feedback loop is one of the biggest advantages of a documentation-based AI chatbot: chatbot conversations can show you exactly where your existing documentation needs improvement.
Best Practices for Better AI Chatbot Answers
A few habits make a noticeable difference in how well the chatbot performs over time.
- Write clear, focused articles that answer one question each
- Use the exact words customers use in titles and content, including common synonyms
- Organize articles with categories and tags that match how customers describe their problems
- Review chatbot conversations regularly and update articles that produce vague or unhelpful answers
- Keep the Knowledge Base current as your product, pricing, or policies change
These practices help any AI chatbot with Knowledge Base content retrieve clearer, more relevant information without forcing you to rewrite your entire support library around the chatbot.
Common Mistakes to Avoid
A few setup mistakes tend to cause most of the early problems with a new chatbot.
- Launching with thin documentation: A chatbot is only as good as the content behind it.
- Ignoring the fallback message: A dismissive fallback can reduce customer trust.
- Never reviewing conversation logs: Regular review is needed to identify weak answers and content gaps.
- Overloading one article with too many topics: Dense articles make it harder for the chatbot to pull a precise answer.
- Forgetting to configure an AI provider: The chatbot won’t function until an API key is set up.
Documentation-Based vs Rule-Based Chatbots
| Feature | Generic Rule-Based Chatbot | Documentation-Based AI Chatbot |
| Source of answers | Prewritten scripts | Knowledge Base content |
| Updating | Edit scripts manually | Update documentation |
| Question handling | Follows predefined paths | Searches relevant documentation |
| Reference links | Depends on implementation | SupportGenix can reference related Knowledge Base articles |
| Setup effort | Depends on the platform | Depends heavily on documentation quality |
Frequently Asked Questions
Does adding an AI chatbot to WordPress require coding knowledge?
No. SupportGenix uses a visual settings dashboard under SupportGenix → Settings → AI Tools → AI Chatbot. You enable the chatbot, connect an API key, and configure display options without writing code. That makes it possible to configure an AI chatbot for WordPress without building a custom chatbot from scratch.
How does SupportGenix use my Knowledge Base?
SupportGenix searches your published Knowledge Base articles for relevant information when answering chatbot questions. It can also reference related articles in the response as clickable links so customers can read the full article.
What happens if the chatbot can’t answer a question?
The chatbot shows its configured Nothing Found or error message along with a Create Ticket link, so customers have a clear path to reach a human agent instead of getting stuck.
How long does it take to train a chatbot on existing documentation?
There isn’t usually a long manual training process. Once your Knowledge Base articles are published and the chatbot is configured, SupportGenix can search that documentation when answering questions.
Can I keep certain articles private but still let the chatbot use them?
Yes. SupportGenix includes an Only for Chatbot option on individual Knowledge Base articles. Checking this box lets the article train the AI without appearing on your public Knowledge Base.
Will an AI chatbot replace my human support team?
No. It’s best used to handle repetitive, low-complexity questions so your team can focus on issues that need judgment, empathy, or account-specific decisions.
How do I know if my chatbot is working well?
Review Total Sessions and Helpful Rate in SupportGenix → Chatbot Conversations, then compare ticket volume before and after launch as a broader business metric.
Conclusion
Adding an AI chatbot for WordPress with SupportGenix comes down to three pieces working together: an enabled chatbot, a connected AI provider, and a well-organized Knowledge Base.
Once those are in place, the chatbot searches your documentation automatically, references related articles in its answers, and gives customers a clear path to human support when it can’t help. Review chatbot conversations regularly to close documentation gaps and keep answers accurate as your product evolves.
Ready to see it in action? Try the SupportGenix AI Chatbot on your WordPress site and connect it to your existing Knowledge Base.
If you’re still building out your support content, start with the Knowledge Base feature page for more support workflow guides.