How to Customize Your WordPress Support Ticket Plugin to Match Your Brand

Quick Answer: You can customize your WordPress support ticket plugin using Support Genix’s General Settings. Go to Support Genix, Settings, General to set your Primary and Secondary Brand Colors, upload an App Logo and App Icon, add a Dashboard Image and Client and Registration Page Image, enable the App Loader, and apply Custom CSS for deeper styling control.
If you run a WordPress site and offer customer support, you probably want your support ticket system to look like it belongs to your brand, not like a bolted-on third-party tool. This guide shows you how to customize your WordPress support ticket plugin using Support Genix, covering brand colors, your App Logo and App Icon, portal images, the App Loader, and Custom CSS.
Support Genix organizes all of these options under Support Genix, Settings, General, split across the Main, Logo, and Style tabs. Following this walkthrough will help you keep your support portal visually consistent with the rest of your website.
Table of Contents
Why Customize Your WordPress Support Ticket Plugin?
Customizing your WordPress support ticket plugin brings several practical benefits beyond aesthetics.
- Brand recognition: Customers should immediately recognize that the support portal belongs to the same company as your main site.
- Consistent customer experience: Matching colors, logo, and visual assets make the transition from your website to the support portal feel seamless.
- Trust and professionalism: A portal that reflects your branding looks more intentional and cohesive rather than generic or default.
- Usability: Clear, well-contrasted colors and recognizable interface elements make it easier for customers to navigate and submit tickets.
What to Prepare Before Customizing Support Genix
Before you start, gather these assets so the process goes smoothly:
- Your primary brand color (hex code)
- Your secondary/accent brand color (hex code)
- Your official logo file (for the App Logo)
- A square icon or favicon (for the App Icon)
- Approved images for the client, registration, and dashboard pages
- Any brand style guidelines you follow
- A plan for testing the finished design on both desktop and mobile
How to Customize Your WordPress Support Ticket Plugin with Support Genix
Step 1: Install and Activate Support Genix
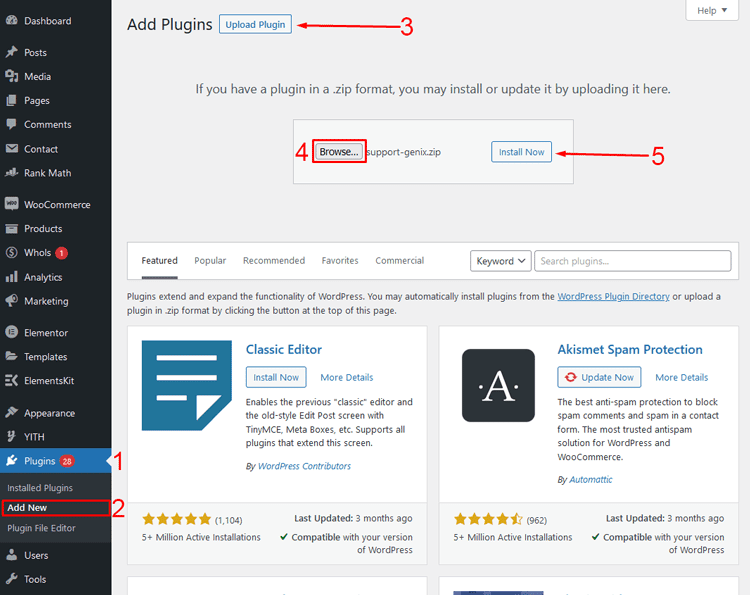
First of all, make sure that the plugin is already installed and activated in your WordPress dashboard.
In case it isn’t, then install Support Genix from Plugins> Add New by searching “Support Genix,” or upload the plugin ZIP file if you have Support Genix Pro. Once activated, the Support Genix menu appears in your WordPress dashboard, giving you access to all settings covered below.
For full setup details, see the installation guide.
Step 2: Set Your Portal’s Registration and Access Options
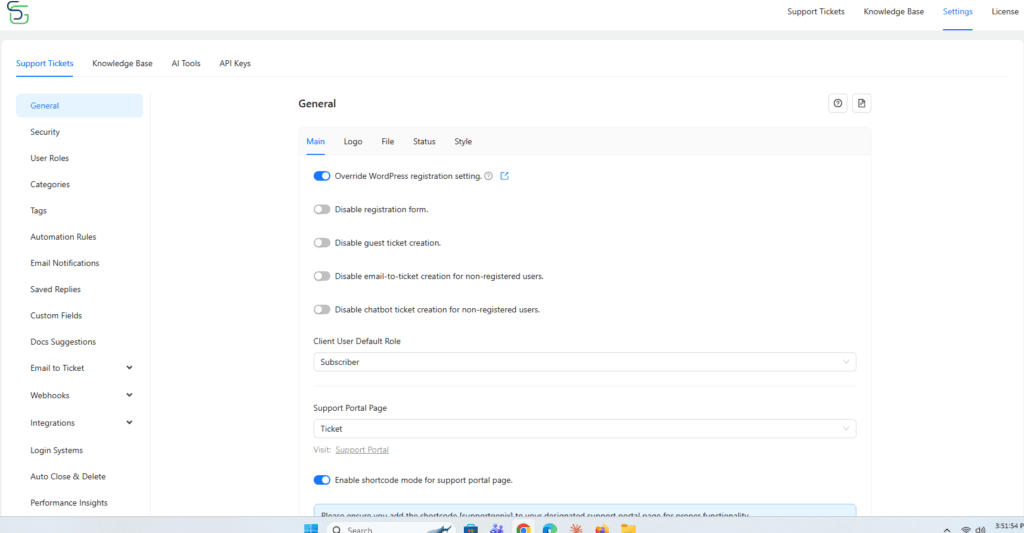
Before styling anything, check the Main tab under Support Genix, Settings, General. Here you can toggle “Override WordPress registration setting,” disable the registration form, disable guest ticket creation, disable email-to-ticket or chatbot ticket creation for non-registered users, set the Client User Default Role, and choose the Support Portal Page with an option to enable shortcode mode.
These settings affect how customers first reach your branded portal, so confirm them before moving on to visual customization.
Step 3: Match the Support Portal Colors to Your Brand
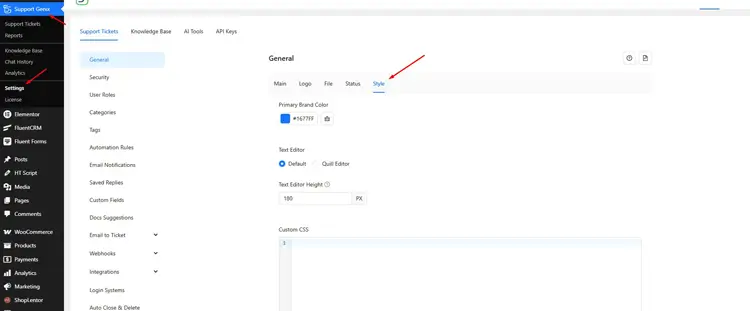
Brand color customization is available under Support Genix, Settings, General, Style. Here you’ll find:
- Primary Brand Color — sets the main branding color used throughout the support interface, shown as a color swatch with a hex code field (for example, #1677FF).
- Text Editor — choose between the Default editor or the Quill Editor for ticket replies.
- Text Editor Height — set the editor’s height in pixels.
- Custom CSS — a code field for additional styling, covered in Step 6.
Click the color swatch to open the picker, enter your brand’s hex code, and click Save Changes. Then review the customer-facing portal to confirm the color displays correctly. When you customize your WordPress support ticket plugin’s color, make sure there’s enough contrast between text and background for readability.
Step 3: Add Your Portal Icon and Portal Logo
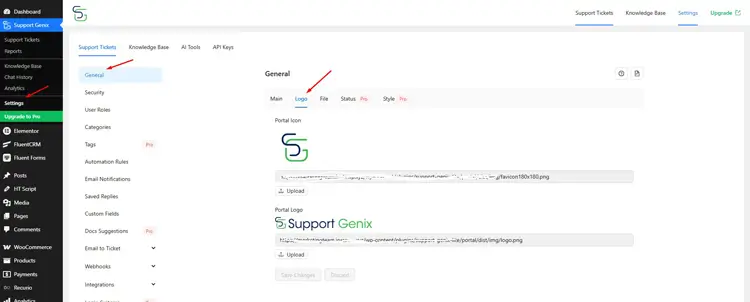
Go to Support Genix, Settings, General, Logo to manage your branded visual assets. Two options serve different purposes:
- Portal Icon — a small square icon, uploaded as an image file, used for smaller branded touchpoints in the portal.
- Portal Logo — the main horizontal logo displayed across the top of the support ticket interface.
Each field shows the current image, its file URL, and an Upload button. Upload clear, correctly sized image files for each, click Upload, then Save Changes, and check how they display in the portal afterward. These are among the most visible branding elements customers encounter, making this step a core part of any WordPress support ticket plugin customization.
Step 5: Configure File Upload Settings
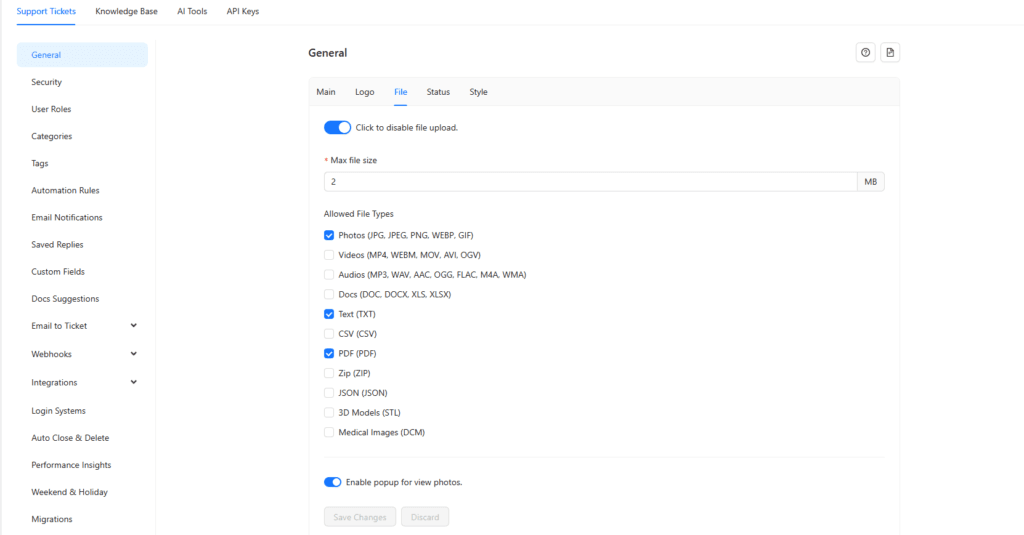
The File tab under Support Genix, Settings, General controls what customers can attach to tickets, not branding images.
Here you can enable or disable file uploads, set the maximum file size in MB, choose allowed file types (such as photos, videos, audio, documents, text, CSV, PDF, ZIP, JSON, 3D models, and medical images), and toggle a popup for viewing photo attachments. Review these settings to make sure customers can attach the file types your support process requires.
Step 6: Fine-Tune the Portal with Custom CSS
For styling beyond the Primary Brand Color, use the Custom CSS field under Support Genix, Settings, General, Style. This code editor field gives you more control over the appearance of the support interface when the built-in color option isn’t enough.
When you customize a WordPress support ticket plugin with CSS, keep changes targeted rather than extensive:
- Make small, targeted changes.
- Test each change before adding another.
- Check desktop and mobile layouts.
- Keep a copy of your custom CSS so you can restore previous styling if needed.
Check Your Customized Support Portal Before Going Live
Before rolling out your branded support portal to customers, run through this checklist:
- Is the App Logo clear and correctly sized?
- Does the App Icon display properly in the browser tab?
- Do the Primary and Secondary Brand Colors match your website?
- Is text readable against all background colors?
- Do buttons and links remain visually clear after color changes?
- Does the Client & Registration Page Image crop correctly?
- Does the Dashboard Image display as expected?
- Does the App Loader appear correctly during load times?
- Did any Custom CSS create layout problems?
- Does the portal display correctly on desktop, tablet, and mobile?
- Can customers still create, view, and reply to tickets normally?
Best Practices for Consistent Support Portal Branding
- Stay within your existing brand color palette rather than introducing new colors.
- Use the official version of your logo, not an outdated or low-resolution copy.
- Maintain sufficient color contrast for readability and accessibility.
- Avoid excessive decorative customization that distracts from usability.
- Use consistent imagery across the client, registration, and dashboard pages.
- Test your customization on multiple screen sizes before publishing.
- Use Custom CSS only when the standard color and image settings aren’t enough.
Common Support Portal Customization Mistakes to Avoid
- Using outdated brand assets that no longer match your current website.
- Choosing colors with poor contrast against text or backgrounds.
- Uploading low-quality or incorrectly sized images.
- Adding excessive Custom CSS that becomes hard to maintain.
- Changing too many visual elements at once, making it hard to track what broke.
- Ignoring how the portal looks on mobile devices.
- Skipping a final test of the customer-facing ticket flow after making changes.
- Following outdated menu paths instead of the current Style and Logo settings.
Support Genix
WordPress Support Ticket Plugin
Take Your Customer Support to The Next Level and Boost Customer Satisfaction Rates
Frequently Asked Questions
Can I customize a WordPress support ticket plugin to match my website?
Yes. Support Genix lets you customize your WordPress support ticket plugin’s brand colors, logo, icon, portal images, loader, and CSS from Support Genix, Settings, General, so the portal visually matches your website.
How do I change the brand colors in Support Genix?
Go to Support Genix, Settings, General, Style and set your Primary Brand Color and Secondary Brand Color using the color picker or a hex code, then click Save. This is a Pro feature.
Can I add my company logo to Support Genix?
Yes. Go to Support Genix, Settings, General, Logo and upload your App Logo for the front-end ticket page, plus a separate App Icon for the browser tab favicon.
Can I use custom CSS to customize Support Genix?
Yes. The Custom CSS field under Support Genix, Settings, General, Style lets you apply targeted CSS rules to the support interface, and it’s a Pro feature.
Can I customize the login and registration page in Support Genix?
Yes. The Client & Registration Page Image setting under Support Genix, Settings, General, Logo lets you upload a custom image for the client login and registration pages.
Do I need Support Genix Pro to customize the support portal?
Some portal customization features require Support Genix Pro. Brand colors and Custom CSS under General, Style are Pro functionality. Other branding options are available under General settings, so check your current plan and dashboard for the exact options available to you.

Closing Thoughts
A consistently branded support portal helps customers recognize that they’re still interacting with your business, not a disconnected third-party tool.
With Support Genix, you can customize your WordPress support ticket plugin’s colors, logo, icon, portal images, loader, and CSS all from one settings area. Work through each setting, save your changes, and run the testing checklist above before making the portal available to customers.