How to Build a WordPress Customer Portal: 7 Easy Steps

Quick Answer: A WordPress customer portal is a dedicated, login-protected page where customers can submit support tickets, track their status, reply to agents, and view conversation history. You can build one using a WordPress support ticket plugin like Support Genix without writing a single line of code.
Managing customer support through scattered emails and contact forms becomes difficult as your WordPress business grows. Customers may not know whether their request was received, while your support team has to keep track of separate conversations and follow-ups.
A WordPress customer portal solves this by giving customers one secure place to submit support tickets, check their status, review previous conversations, and reply to your team.
In this guide, you’ll learn what a customer portal should include and how to build one in WordPress with Support Genix, from creating the portal page to configuring notifications and customizing the experience.
Table of Contents
What Is a WordPress Customer Portal?
A WordPress customer portal is a private section of your website where customers log in and manage their support interactions.
It is not the same as a contact form. A contact form sends a one-time message with no way to track what happened next. A customer portal gives every conversation a unique ticket ID, a visible status, and a full history that both the customer and your team can follow.
It is also different from a general WordPress user account. A standard user account manages passwords, orders, or membership settings. A customer support portal is built specifically around ticket submission, ticket tracking, and communication between customers and support agents.
The result is a structured support experience. Customers know where to go, what to expect, and how to follow up without sending a new email every time.
Why Should You Build a Customer Portal in WordPress?
Most businesses handle support through email inboxes or contact forms. This works at small scale, but it creates problems as volume grows.
Here is what a dedicated support portal solves:
- Scattered conversations: Tickets live in one place instead of three inboxes.
- Repeated questions: Customers can check their ticket status without emailing again.
- No visibility: Both sides can see the full conversation history in one thread.
- Lost follow-ups: Every ticket gets a unique ID and status so nothing disappears.
- Inconsistent responses: Agents can see previous replies before responding.
For WooCommerce stores, SaaS products, digital product businesses, online courses, and membership sites, this kind of organized support system reduces confusion and makes it easier for customers to get real help.
What Features Should a Customer Portal Include?
Not every portal needs to do everything. But a support-focused portal should cover the basics that customers expect.
Essential features:
- Customer registration and login
- Ticket submission with subject, description, and attachments
- Unique ticket ID for reference
- Ticket status visibility (current ticket status, such as active, in progress, closed, or a customized status label)
- Threaded conversation history
- Ability to reply to existing tickets
- Email notifications for ticket updates and agent replies
- Password management
Useful but optional:
- Social login (Google or similar)
- Guest ticket submission without registration
- Custom ticket categories and priority levels
- Searchable knowledge base or self-help articles
- Custom portal branding (colors, logo, favicon)
- Custom ticket status labels
- File attachment support per ticket or reply
When evaluating a WordPress support ticket plugin, check which features come with the free version and which require a paid plan. Not everything you see in a demo will be available on a basic installation.
Support Genix
WordPress Support Ticket Plugin
Take Your Customer Support to The Next Level and Boost Customer Satisfaction Rates
How to Build a WordPress Customer Portal with Support Genix
Support Genix is a WordPress help desk plugin that creates a support-focused customer portal directly on your website. Customers can register, log in, submit tickets, track progress, and reply to agents — all from a dedicated page on your site.
Here is how to set it up from scratch.
Step 1: Install and Activate Support Genix
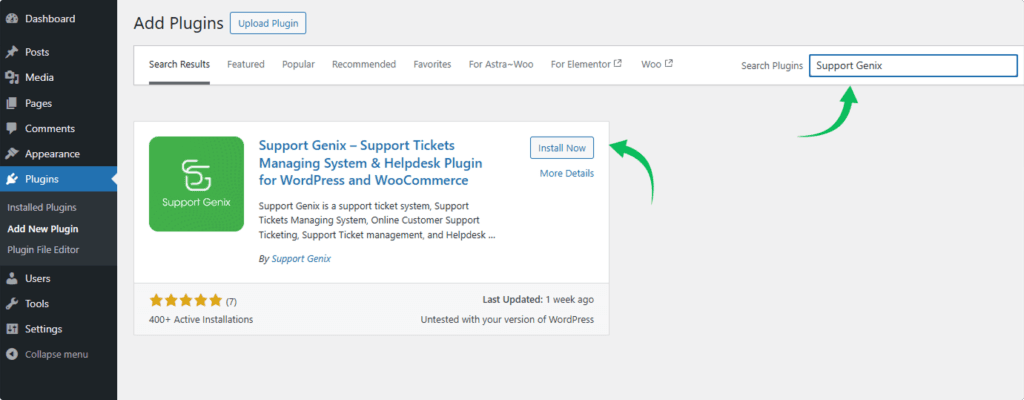
Start by installing the plugin from the WordPress plugin directory or uploading it manually.
Go to your WordPress dashboard, navigate to Plugins > Add New, search for Support Genix, install it, and activate it.
You can also follow the Support Genix installation guide for detailed steps.
Step 2: Create the Portal Page
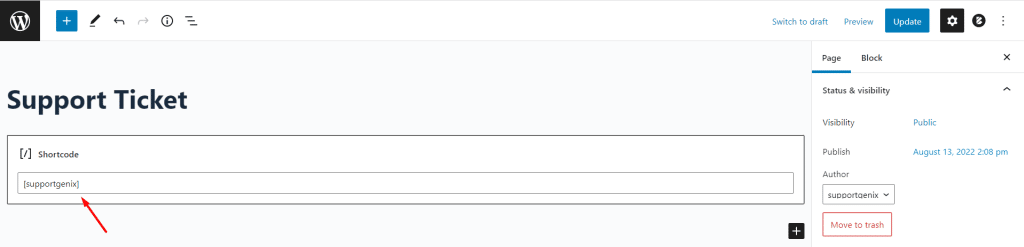
Support Genix uses a shortcode to embed the customer portal on any WordPress page.
Create a new page in WordPress (for example, named “Support” or “Help Desk”), add the Support Genix shortcode to the page content, and publish it. Once published, this page becomes the customer-facing portal where all ticket activity happens.
Make the portal easy to find. Add a link to your main navigation labeled “Support”, “Help”, or “Submit a Ticket”. A portal customers cannot find is a portal they will not use.
For details on creating and setting up the ticket page, refer to the how to use shortcode for the ticket page documentation.
Step 3: Configure Customer Registration and Login
Customers need an account to submit and track their tickets.
By default, Support Genix allows customers to register directly on the portal page. After registration, they are logged in automatically.
If your site has enabled social login, customers may also be able to log in with Google or Envato — this depends on how the administrator has configured login methods.
Some sites allow guest ticket submission without registration. With this option, a customer enters their email address, submits a ticket, and receives a tracking link by email. Guest access availability depends on your site’s configuration.
You can also completely disable registration or guest submission if your workflow requires all users to have accounts.
Step 4: Allow Customers to Submit Tickets
Once logged in, customers see a “New Ticket” button on the portal dashboard.
Clicking it opens a ticket form where they can fill in:
- A subject or issue title
- A description of the problem
- Relevant category or product
- Priority level (if enabled)
- File attachments such as screenshots or documents
After submitting, the customer receives a confirmation with their Ticket ID. This ID is their reference number for tracking, replying, and following up.
Encourage customers to write clear subject lines and include specific details. A ticket that says “it is not working” is much harder to resolve than one that describes the exact problem with screenshots.
Step 5: Let Customers Track and Reply to Tickets
After submission, customers can view all their tickets from the portal dashboard.
Each ticket shows:
- Track ID (unique reference number)
- Subject
- Current status (open, pending, closed, or custom labels)
- Last reply date
- Number of replies
Customers can click any ticket to open the full conversation thread. From there, they can read agent replies, add their own response, attach additional files, and view any status changes.
If a ticket is closed but the issue is not fully resolved, customers can add a reply to reopen it. This depends on how the site has been configured — some sites disable reopening and require a new ticket instead.
For a complete walkthrough of the customer experience, see the customer portal guide for submitting and tracking tickets.
Step 6: Configure Email Notifications
Email notifications keep customers informed without them needing to log back in.
Support Genix sends automatic email notifications for:
- Ticket created (confirmation to the customer)
- Agent reply (notification when a support agent responds)
- Status change (notification when the ticket status updates)
Check that your WordPress site is sending emails reliably before launching. Use an SMTP plugin or a transactional email service to avoid delivery failures. Ask customers to check their spam folders if notifications are not arriving.
Step 7: Customize the Portal Design
Out of the box, the Support Genix portal has a clean default design. If you want it to match your brand, the portal branding options let you change how it looks.
Portal branding is a Pro feature. To access it, go to Support Genix > Settings > General > Style.
From there, you can customize:
- Primary brand color: Used for buttons, links, and active states (default: green)
- Secondary brand color: Used for hover states, badges, and accents (default: orange)
- Text editor: Choose between TinyMCE (full-featured) or Quill (lightweight)
- Editor height: Adjust the reply box height (default: 180px, minimum: 100px)
- Custom CSS: Add CSS rules to override any portal styling globally
In the main General Settings, you can also upload:
- A custom app logo for the portal header
- A custom favicon for the browser tab
- Footer copyright text (with placeholder support for site name, URL, and year)
See the full options in the customize portal branding documentation.
How to Match the Portal to Your Brand
Even without custom CSS, a few practical choices make the portal feel like part of your website.
- Match the primary color to your main site’s brand color
- Upload your logo so the portal header looks familiar
- Use a favicon that matches your main website
- Keep button labels simple: “Submit a Ticket” and “My Tickets” are clearer than “Open a Case” or “Contact Support”
- Test on mobile — most customers will access the portal on their phone at some point
- Maintain enough color contrast so text is readable on both light and dark backgrounds
- Avoid excessive CSS changes unless there is a clear reason
Consistency matters. If a customer moves from your main website to the support portal and it looks completely different, it creates doubt.
Customer Portal Best Practices
These apply regardless of which plugin or setup you use.
- Make it easy to find. Add the portal link to your header navigation, footer, and any post-purchase email sequences.
- Set response expectations. Tell customers upfront how long they can expect to wait for a reply.
- Ask for useful information upfront. Use custom fields to collect browser type, order number, or product version at ticket submission. This reduces back-and-forth.
- Keep ticket statuses clear. Rename default statuses if the standard labels do not match your workflow. You can customize ticket status labels in Support Genix to use terminology your team and customers actually understand.
- Add knowledge base content. Self-service resources reduce ticket volume for common questions. If customers can find the answer themselves, they will.
- Test email delivery before launching. Send test tickets and confirm that all notification emails arrive in the inbox, not spam.
- Test the full experience as a customer. Register a test account, submit a ticket, reply to it, and close it. Find and fix any friction before real customers encounter it.
- Protect customer data. Use HTTPS on your site. Limit access to ticket data to agents who need it. Do not expose customer information publicly.
Common Mistakes to Avoid
Hiding the portal link. If customers cannot find the support page, they will email you directly or abandon the interaction entirely.
Using vague ticket labels. Status labels like “In Progress” or “Pending” mean different things to different people. Be specific about what each status means.
Asking for too much upfront. A long ticket form with ten required fields discourages submission. Start with the minimum needed and gather more information through replies.
Skipping notification testing. If email notifications are broken, customers will not know when their ticket has been answered. They will assume they were ignored.
Ignoring mobile users. Test the portal on a phone before launch. A portal that is hard to navigate on mobile is a broken portal for a large portion of your users.
Promising response times you cannot meet. If you tell customers to expect a reply in 24 hours, make sure you can actually deliver that. Broken expectations cause more frustration than no expectation at all.
Treat the portal as a complete business system. A support ticket portal handles ticket communication. It is not a CRM, an invoicing platform, a project management tool, or a document collaboration system. Do not try to make it do everything.
Is Support Genix Suitable for a WordPress Customer Portal?
Support Genix is a good fit if your primary goal is giving customers a private, organized place to submit and manage support tickets on your WordPress site.
It handles the core workflow well:
- Customer registration and login
- Ticket submission with attachments
- Ticket tracking with unique IDs
- Threaded conversations between customers and agents
- Email notifications for both sides
- A clean default portal design, with advanced brand colors, custom CSS, and editor customization available in Pro.
It also integrates with WooCommerce, Easy Digital Downloads, Tutor LMS, FluentCRM, BetterDocs, WhatsApp, Slack, and other tools — which makes it practical for stores, course platforms, and digital product businesses.
If your business needs advanced project management, client invoicing, document collaboration, or CRM pipeline features, you will likely need additional tools alongside the portal.
For businesses that primarily need a structured way for customers to submit and track support requests directly on their WordPress site, Support Genix covers that use case without requiring complex setup or technical knowledge.
You can explore the full list of features on the Support Genix features page or review the pricing page to compare the free and Pro plans.
Frequently Asked Questions
What is the difference between a customer portal and a contact form?
A contact form sends a one-time message with no tracking. A customer portal gives every submission a unique ticket ID, a visible status, a full conversation thread, and email notifications. Customers can follow up on existing tickets instead of starting over with a new message each time.
Can I customize a Support Genix customer portal?
Yes. The free version includes a clean default design. The Pro version adds full branding controls, including primary and secondary brand colors, custom CSS, text editor selection, editor height, logo, favicon, and footer text customization. All style settings are accessible under Support Genix > Settings > General > Style.
Can customers submit tickets without registering?
This depends on how the site is configured. Support Genix supports guest ticket submission, where a customer enters their email address and submits a ticket without creating an account. They receive a tracking link by email. However, this option must be enabled by the site administrator and may not be available on all installations.
Is Support Genix suitable for WooCommerce websites?
Yes. Support Genix has a WooCommerce integration that connects ticket submissions to customer orders. This allows support agents to see order information alongside ticket details, which is useful when customers are reporting issues related to specific purchases.
What should I test before launching a customer portal?
Test the full customer journey: register an account, submit a ticket, check the confirmation email, reply to the ticket, and close it. Also test that all email notifications arrive in the inbox (not spam), that the portal works correctly on mobile, and that the portal page is easy to find from your site navigation.
Conclusion
A WordPress customer portal gives your support process structure. Customers know where to go, how to submit a ticket, and how to check on it later. Your team gets a centralized view of every conversation without managing separate email threads.
Support Genix handles the core of this: registration, ticket submission, tracking, replies, notifications, and optional brand customization — all inside WordPress, without requiring developer involvement for the initial setup.
If you are evaluating the option, start with the documentation. The customer portal guide walks through the complete customer experience, and the features page shows what is included in the free and Pro versions.