How to Configure reCAPTCHA in SupportGenix
Spam submissions can quickly overwhelm your support system and reduce productivity. SupportGenix includes built-in support for Google reCAPTCHA v3, allowing you to protect ticket forms, login pages, and registration forms without interrupting the user experience.
This guide walks you through setting up and configuring reCAPTCHA in SupportGenix, step by step, in a clear and user-friendly way.
What Is reCAPTCHA v3 and Why SupportGenix Uses It
Google reCAPTCHA v3 works silently in the background to detect suspicious behavior. Unlike older versions, it does not require users to click checkboxes or solve puzzles, making it ideal for customer support workflows.
With reCAPTCHA enabled in Support Genix, you can:
- Prevent spam tickets and fake registrations
- Protect login and ticket submission forms
- Improve overall support quality
- Keep forms fast and friction-free for real users
Before You Start
Before configuring reCAPTCHA in SupportGenix, make sure you have:
- A Google account
- Access to Google reCAPTCHA Admin Console
- Your website domain ready
You will need to generate two keys:
- Site Key
- Secret Key
Step 1: Generate reCAPTCHA v3 Keys from Google
- Go to the Google reCAPTCHA Admin Console
- Click Create to register a new site
- Enter a label (for your reference)
- Select reCAPTCHA v3 as the type
- Add your website domain (without https)
- Accept the terms and submit
Google will generate:
- Site Key
- Secret Key
Keep both keys secure. You will need them in the next step.
Step 2: Open reCAPTCHA Settings in SupportGenix
From your WordPress dashboard:
- Go to SupportGenix → Settings
- Open the Security tab
- Locate the reCAPTCHA (v3) section
This is the central place to manage all reCAPTCHA-related settings in SupportGenix.

Step 3: Enable reCAPTCHA in SupportGenix
- Toggle Enable reCAPTCHA to active
- Paste your Site Key into the Site Key field
- Paste your Secret Key into the Secret Key field
Once both keys are added, additional options will become available.

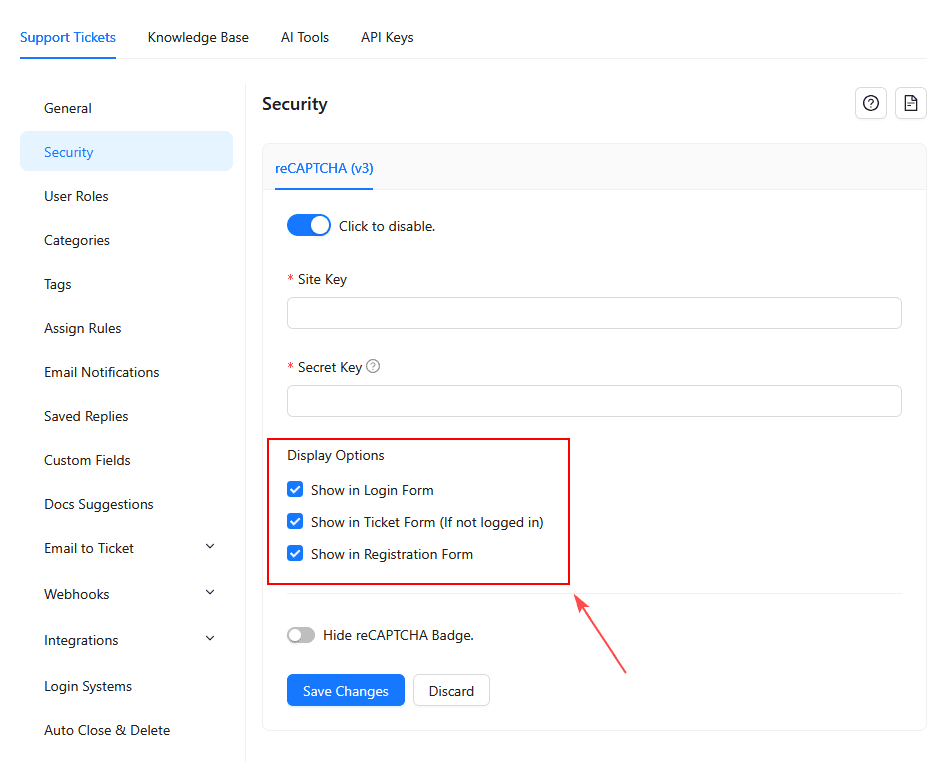
Step 4: Choose Where reCAPTCHA Will Appear
Support Genix allows you to control where reCAPTCHA protection is applied.
You can enable reCAPTCHA on:
- Login Form
- Ticket Submission Form (for non-logged-in users)
- User Registration Form
Simply check the forms you want to protect.
This flexibility helps you balance security and usability based on your workflow.
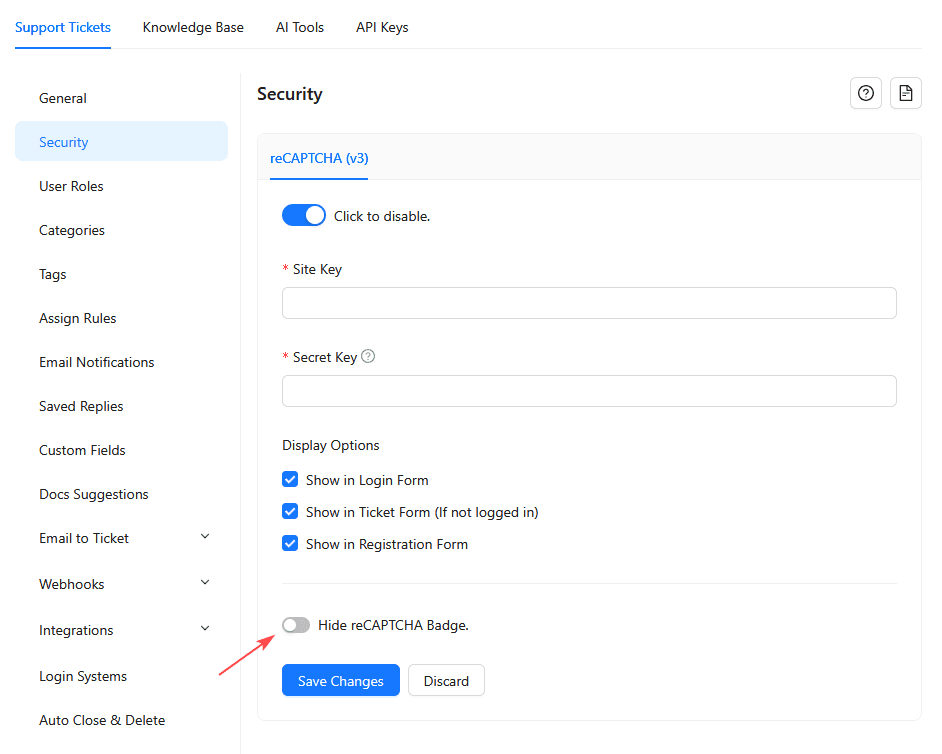
Step 5: Optional – Hide reCAPTCHA Badge
Google displays a small reCAPTCHA badge by default.
If you prefer a cleaner interface, you can enable:
- Hide reCAPTCHA Badge
Note: Make sure hiding the badge complies with Google reCAPTCHA branding requirements.
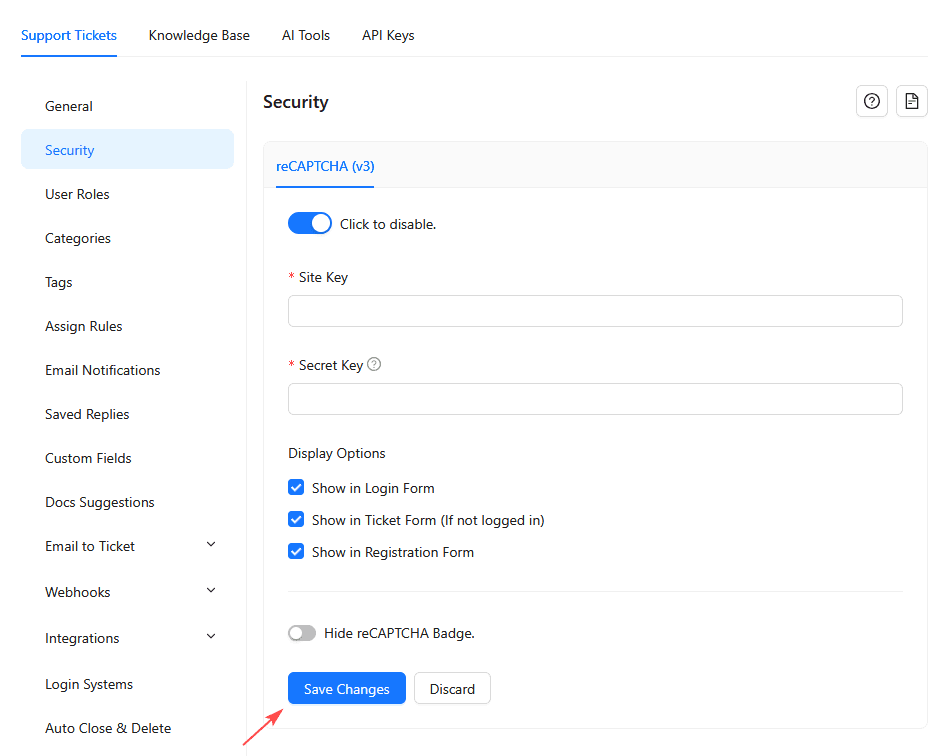
Step 6: Save Your Settings
After completing the configuration:
- Click Save Changes
- Clear any site or plugin cache if active
Your Support Genix forms are now protected by reCAPTCHA.
How to Test reCAPTCHA Configuration
To ensure everything is working correctly:
- Submit a ticket as a guest user
- Try registering a new account
- Check login attempts
If reCAPTCHA is active, spam submissions should be blocked automatically without user interaction.
Common Issues and Troubleshooting
reCAPTCHA Not Working
- Double-check Site Key and Secret Key
- Make sure the correct domain is added in Google reCAPTCHA
- Confirm reCAPTCHA v3 is selected (not v2)
Forms Not Submitting
- Clear cache and test again
- Disable conflicting security plugins temporarily
- Ensure JavaScript is not blocked by your theme or CDN
Best Practices for Using reCAPTCHA in SupportGenix
- Use reCAPTCHA on public-facing forms only
- Avoid enabling unnecessary security layers together
- Monitor spam levels and adjust form protection accordingly
Final Thoughts
reCAPTCHA integration in SupportGenix helps you maintain a clean, reliable, and spam-free support environment. With silent background protection and flexible display options, it improves security without affecting customer experience.
If you need further assistance or advanced security recommendations, our support team is always here to help.
Last updated on March 5, 2026
Was this article helpful?
Powered by Support Genix